ACOUSTIC GUITAR KIT
The Best DIY Acoustic Guitar Kit to Build From Scratch
Table of Contents
Wouldn’t it be really nice if you could take a ~$600 guitar kit and build up an acoustic guitar from scratch worth $2,000? The truth is… this is actually reality.
If you want to take on a challenge, refine and build up your luthier and woodworking skills, and have tons of fun in the process, then building your own acoustic could be the perfect project.
After reading this guide you’ll be able to go out there and build your own acoustic guitar from a quality starter kit. The best part is, your completed guitar will match the quality of an acoustic worth a low 4-figures on the market (and this is non-embellished).
I’m going to introduce you to the best acoustic guitar kits available today. These are quality kits where the critical machining has already been done for you, and all you need to do is step in and complete the assembly.
You don’t need a big shop for this either. In fact, all you need are a few specialty woodworking and luthier tools you can pick up before you begin (we’ll cover required tools further down in an exhaustive list).
The Best Acoustic Guitar Kits to Purchase
To put it bluntly, there aren’t many great acoustic guitar kits on the market. You’ll find a bunch of electric guitar kits, ukulele kits, and even cigar box guitar kits, but good acoustic kits seem somewhat elusive. Why is this?
Well, the main reason is the difficulty of assembly. It takes much more effort, tools, and know-how to build your own acoustic from scratch (compared to, say, an electric guitar).
But it’s incredibly rewarding when you do finally build your own!
After scouring acoustic guitar kit manufacturers in an attempt to find the best, we narrowed it down to the following:
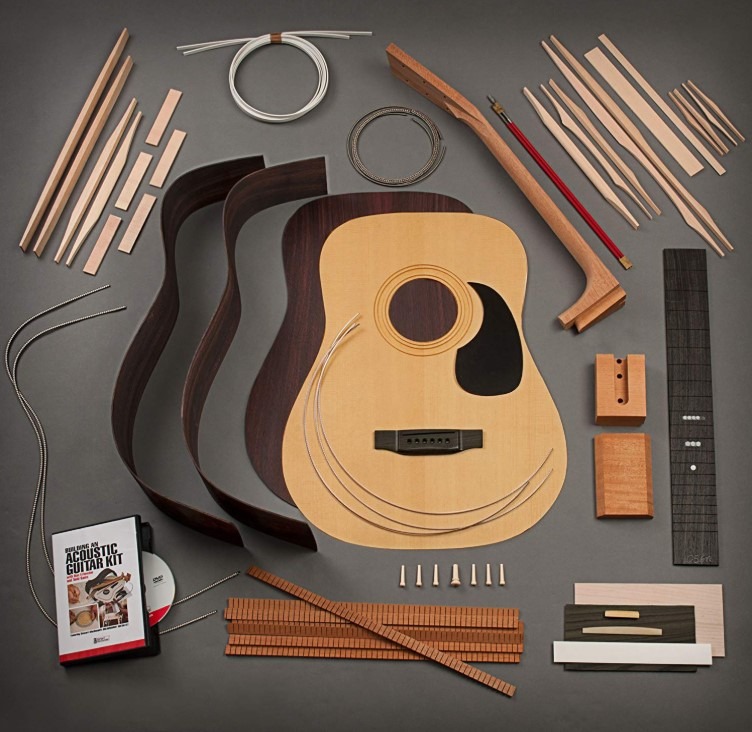
Our #1 Pick: StewMac Dreadnought Acoustic Guitar Kit
This acoustic guitar kit is modeled after a vintage Martin Guitar, is built from AAA tonewoods, and includes an instruction booklet along with a DVD course on guitar making.
All of the critical machining is done for you, so you don’t need a big shop to build it up from scratch.
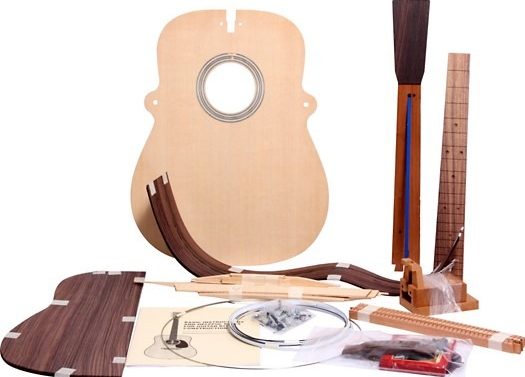
Runner Up: Martin Build Your Own Guitar Kit
This is a great kit where you’ll be able to build up a quality solid spruce top acoustic guitar.
All critical machining steps (such as soundboard finishing, fretboard slotting, fingerboards, and neck-joint machining) have been done for you, leaving you in charge of the remaining assembly process (body assembly, fretting, etc.)
We’ll explain in detail why these particular acoustic kits are both the best and most frequently purchased.
So You Want to Build Your Own Acoustic Guitar...
It won’t be easy. This is one of those cases where “It’s much harder than it looks!” rings true.
Unless you have extensive woodworking experience, it might take you a bit of time to get up to speed and building.
However… don’t let this deter you. What some may find difficult others embrace as an incredible learning experience.
In fact, if you really do want to practice and build up both your luthier and woodworking skills, there’s no better project than building an acoustic guitar.
You’ll need some space to work, such as a worktable or workbench, and you’ll also need some specialty tools (which we cover in the ‘tools required’ section below).
The best advice is to take it slow, invest in the right tools, and get your acoustic built right the first time. It takes anywhere from a week of working on it daily all the way up to 8 months of occasional work as a hobby. There’s no set timeframe.
How quickly or how relaxed you decide to build your acoustic guitar is entirely up to you, but I want to reiterate something because it's incredibly important: Slow down, invest in the right tools, and take the time to do it right!
And if you take the time if you do it right, and if you’re patient with yourself throughout the whole process, you’ll end up with a masterpiece acoustic guitar that sounds crisp, has impeccable tone, and feels alive.
Why the StewMac Dreadnought Kit is Best
The StewMac Dreadnought Acoustic Guitar Kit is our first choice because of quality, reputation, and the professional direction provided during assembly.
Not only do you get a full manual explaining the build process step-by-step, but you also get an instructional DVD with videos on how to build your own acoustic guitar.
Todd Sams and Dan Erlewine, two professional luthiers, explain the art of guitar making in a clear and easy to follow video series.
And if that’s not enough, I took a look at this glowing review from luthier John Calkin (published in the journal of the Guild of American Luthiers):
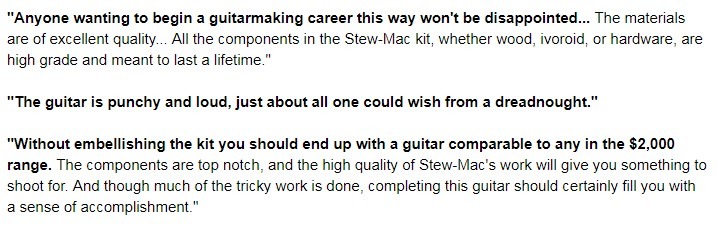
When a professional luthier says the guitar you build (without embellishment) is comparable to a commercial acoustic guitar in the 4-figure price range -- I’d say that’s impressive!
Here's a complete list of what's included in this kit:
- AAA Tonewood (Indian Rosewood Back)
- Neck joint that’s precisely machined at the 14-fret
- Rosette, trim, pickguard, endpin, bridge pins, and frets
- Heavy cardboard molds that are pre-cut (for easy body assembly)
- Bracing template and full-size blueprint
- An adjustable truss rod (two way)
- Instructional DVD: Building an Acoustic Guitar Kit
- 36-Page Assembly Instructional Booklet (Fully Illustrated)
Nowhere else do you get a kit with such meticulous guidance, quality, and care for your build.
As soon as you open this kit up, it actually feels like they want you to be successful. A lot of assembly kits, unfortunately, are quite the opposite.
This is a great kit overall and highly recommended if you’re going to take up the task of building your own acoustic. As I mentioned earlier remember to slow down, get the right tools, and make an acoustic guitar masterpiece!
An Overview of the Building Process
Now that you know roughly what building your own acoustic entails, let's get into the nitty-gritty details of a complete build.
We’ll be referencing the StewMac Dreadnought Kit for this example build.
Note that there is an official instruction booklet for this build, which you can view in full here.
The instructional booklet goes through the following steps:
Step 1: You’ll begin by assembling the sides and making a body mold.
Step 2: Then you’ll install the soundhole rosette, soundboard bracing, and fit the soundboard to the sides of your guitar.
Step 3: Back bracing and fitting comes next in the process.
Step 4: Then there’s a routing step for installing your acoustic’s binding.
Step 5: You’ll fill and fit the truss rod channel.
Step 6: You’ll drill and shape the peghead.
Step 7: You’ll make and inlay the fretboard.
Step 8: You’ll fit and shape the neck of your acoustic.
Step 9: You’ll perform some finishing touches and final assembly.
Complete! At this point, you’ll have a fully built, quality acoustic guitar!
Even though there are quite a few steps involved in a build like this (not to mention a decent set of woodworking and luthier skills), it is extremely rewarding once you’ve built up your acoustic masterpiece and can look at it with pride.
If it isn’t for anything but that feeling (and the love of guitars, of course!) then you should seriously consider putting together a complete acoustic guitar.
We’ll talk about all of the tools required in the next section.
If you’d like to pick up this kit for yourself, you can check it out on Amazon.Tools Required for a Full Acoustic Build
Before starting your build you’ll want to make sure you have all of the required tools available and on hand.
In this section, I’ll go through all of the required tools in detail, particularly focusing on the equipment list from the StewMac Acoustic Guitar Kit.
Environment and Climate Control
As mentioned earlier, the beauty of these acoustic kits is that you don’t need a big shop or lots of space to have a successful build.
But you do need a dedicated space, preferably a dedicated room, where you’ll be building your acoustic.
I’m recommending a room or separate area only because its easier to measure and control the temperature/humidity.
As you know, wood can warp and wood can crack. This is why it's crucial you acclimate the wood from your acoustic kit to the environment you’re building in.
When you first get your kit, you want to leave it in your work area for a week. This lets the wood “equalize”.
With regard to climate control, you’ll want to shoot for a relative humidity of 45-50% and a temperature of 70-80 Fahrenheit.
If you’re not meeting these levels based on the climate, or if you’re in a season where the temperature and humidity can jump drastically, it’s recommended you hold off building until you can either stabilize the environment or enter a season where there isn’t much fluctuation.
If you need a great thermometer/hygrometer combo that you can put in your work area, I have this ThermoPro and it works very well.
Preparing Your Workboard
Before you start building you’ll need a flat piece of workboard.
This should be plywood that’s ¾” thick, 24” long, and 20” wide (the dimensions required to fit the guitar body).
I’d recommend going to your nearest hardware store and getting either a piece of plywood cut or if you have any scrap wood nearby, you can repurpose it.
And even if you want to order it online, there’s a 0.75” Marine Grade Plywood 24” x 24” available for purchase on Amazon (but the shipping costs are higher since it weighs 20 lbs).
Acoustic Guitar Kit Building Tools
Tools for Binding Installation
The first set of tools we’re going to talk about are precision routing sets. You’ll need these to install your acoustic guitar’s binding.
We recommend this precision router set that ships with everything you need. It has a Dremel tool and precision router all in one (including all required attachments and bits).
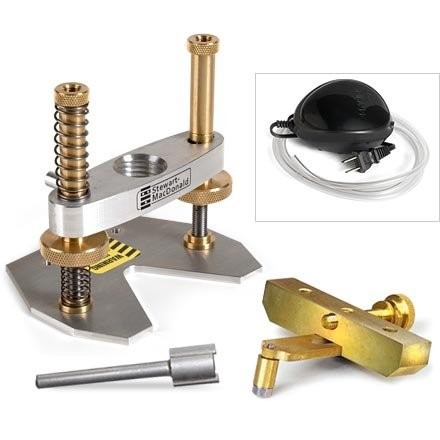
You can also use your own router or laminate trimmer, but you’ll need a router bit with a 0.25” arbor and a 6-degree cutting edge (to prevent grabbing).
You’ll need appropriately sized router bearings. This would be a 0.060” bearing and a 0.200” bearing (sized for your acoustic guitar’s binding).
Tools for Soundboard Bracing and Installation
When it comes to installing your acoustic guitar’s soundboard bracing and fitting the soundboard to the sides, you’ll need lots and lots of clamps!
Luckily, there’s a complete acoustic guitar clamp kit available for purchase that has every type of clamp you need.
This clamp kit includes strong cam clamps (both small and large sizes) along with spool clamps that have tubing on the rods to prevent scratches on your instrument. There are 24 clamps in total.
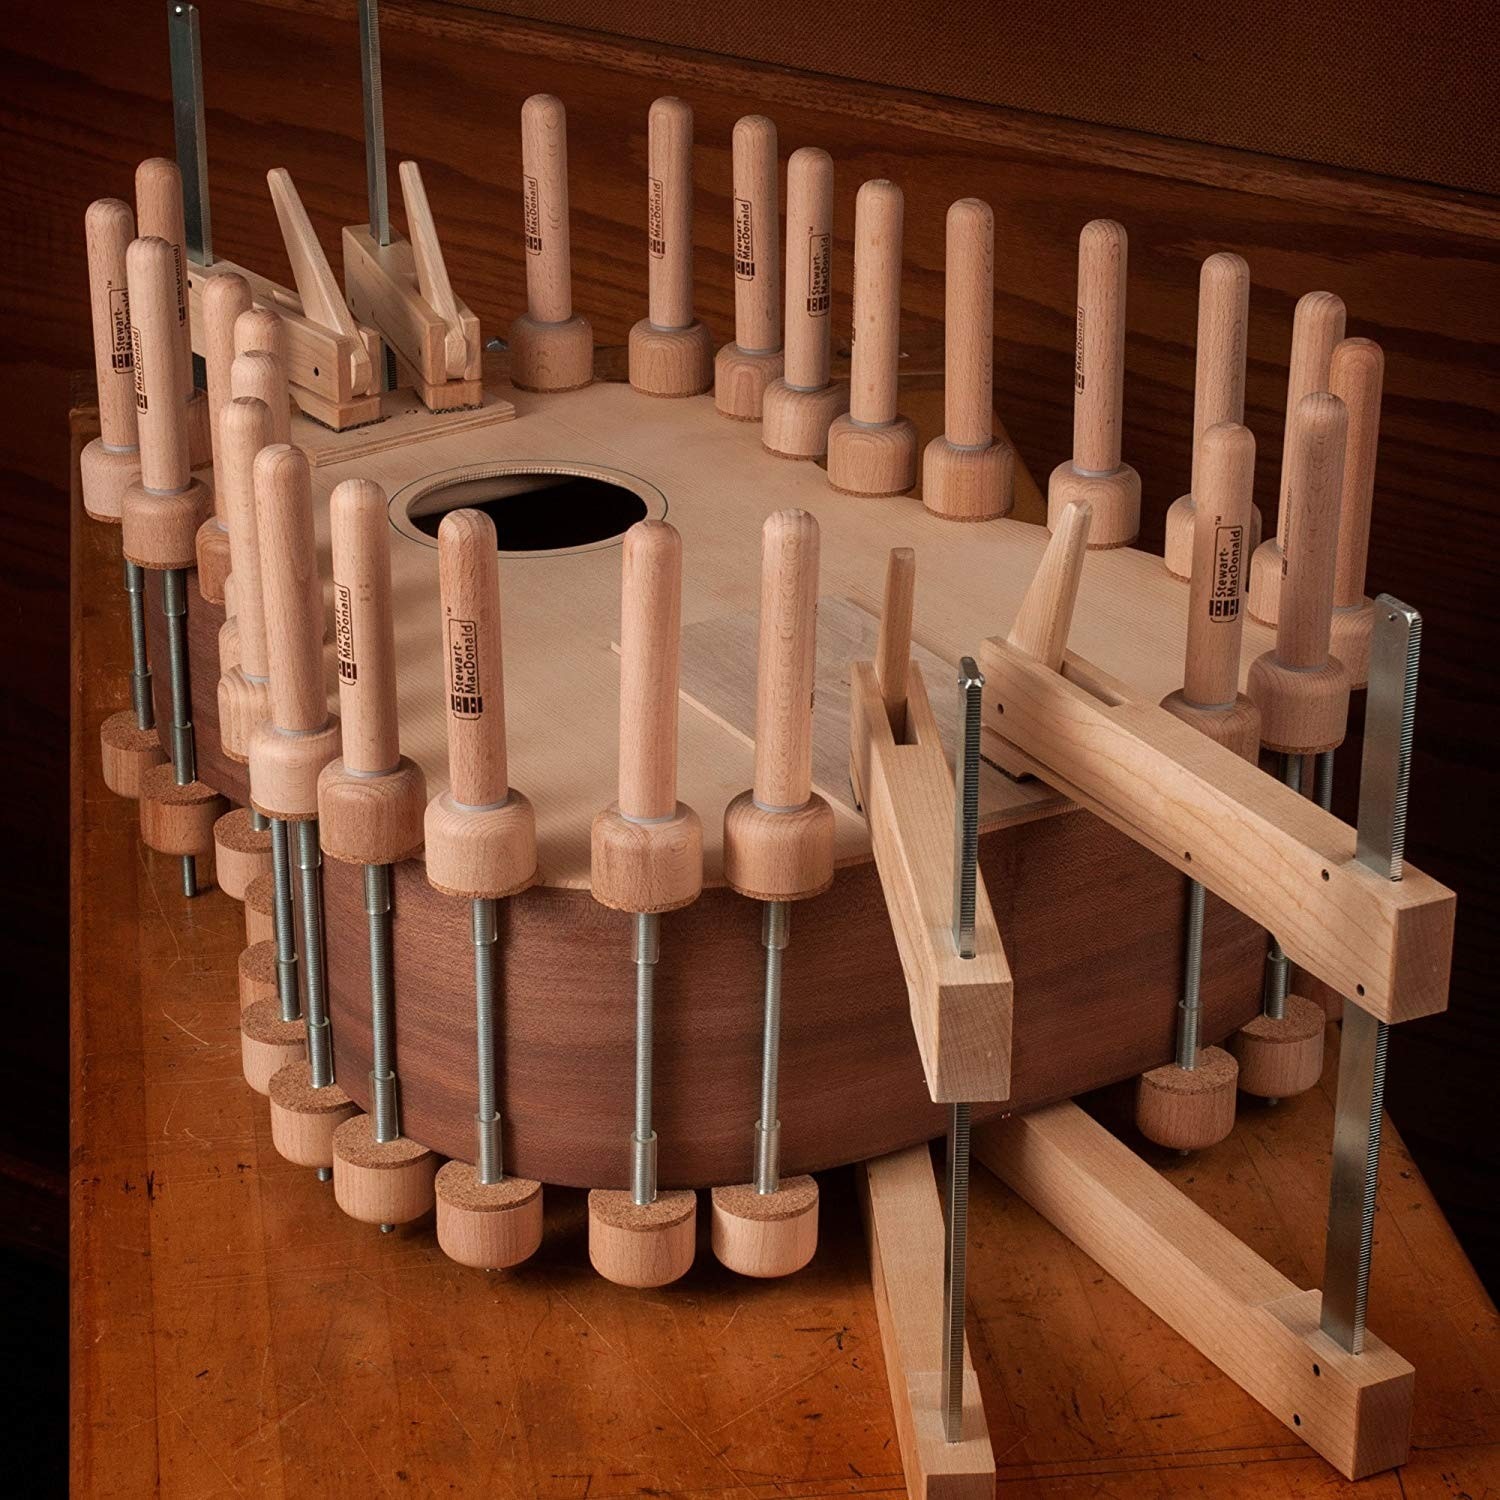
If you’ll be building the StewMac Mahogany Dreadnought Acoustic Guitar Kit we recommended earlier, this clamp kit provides the exact number of clamps mentioned in their “Recommended Tools and Supplies” section of the instruction manual.
Unless you’re willing to buy/make 24 of your own spool clamps, it’ll save you a lot of time to get a fully kitted set.
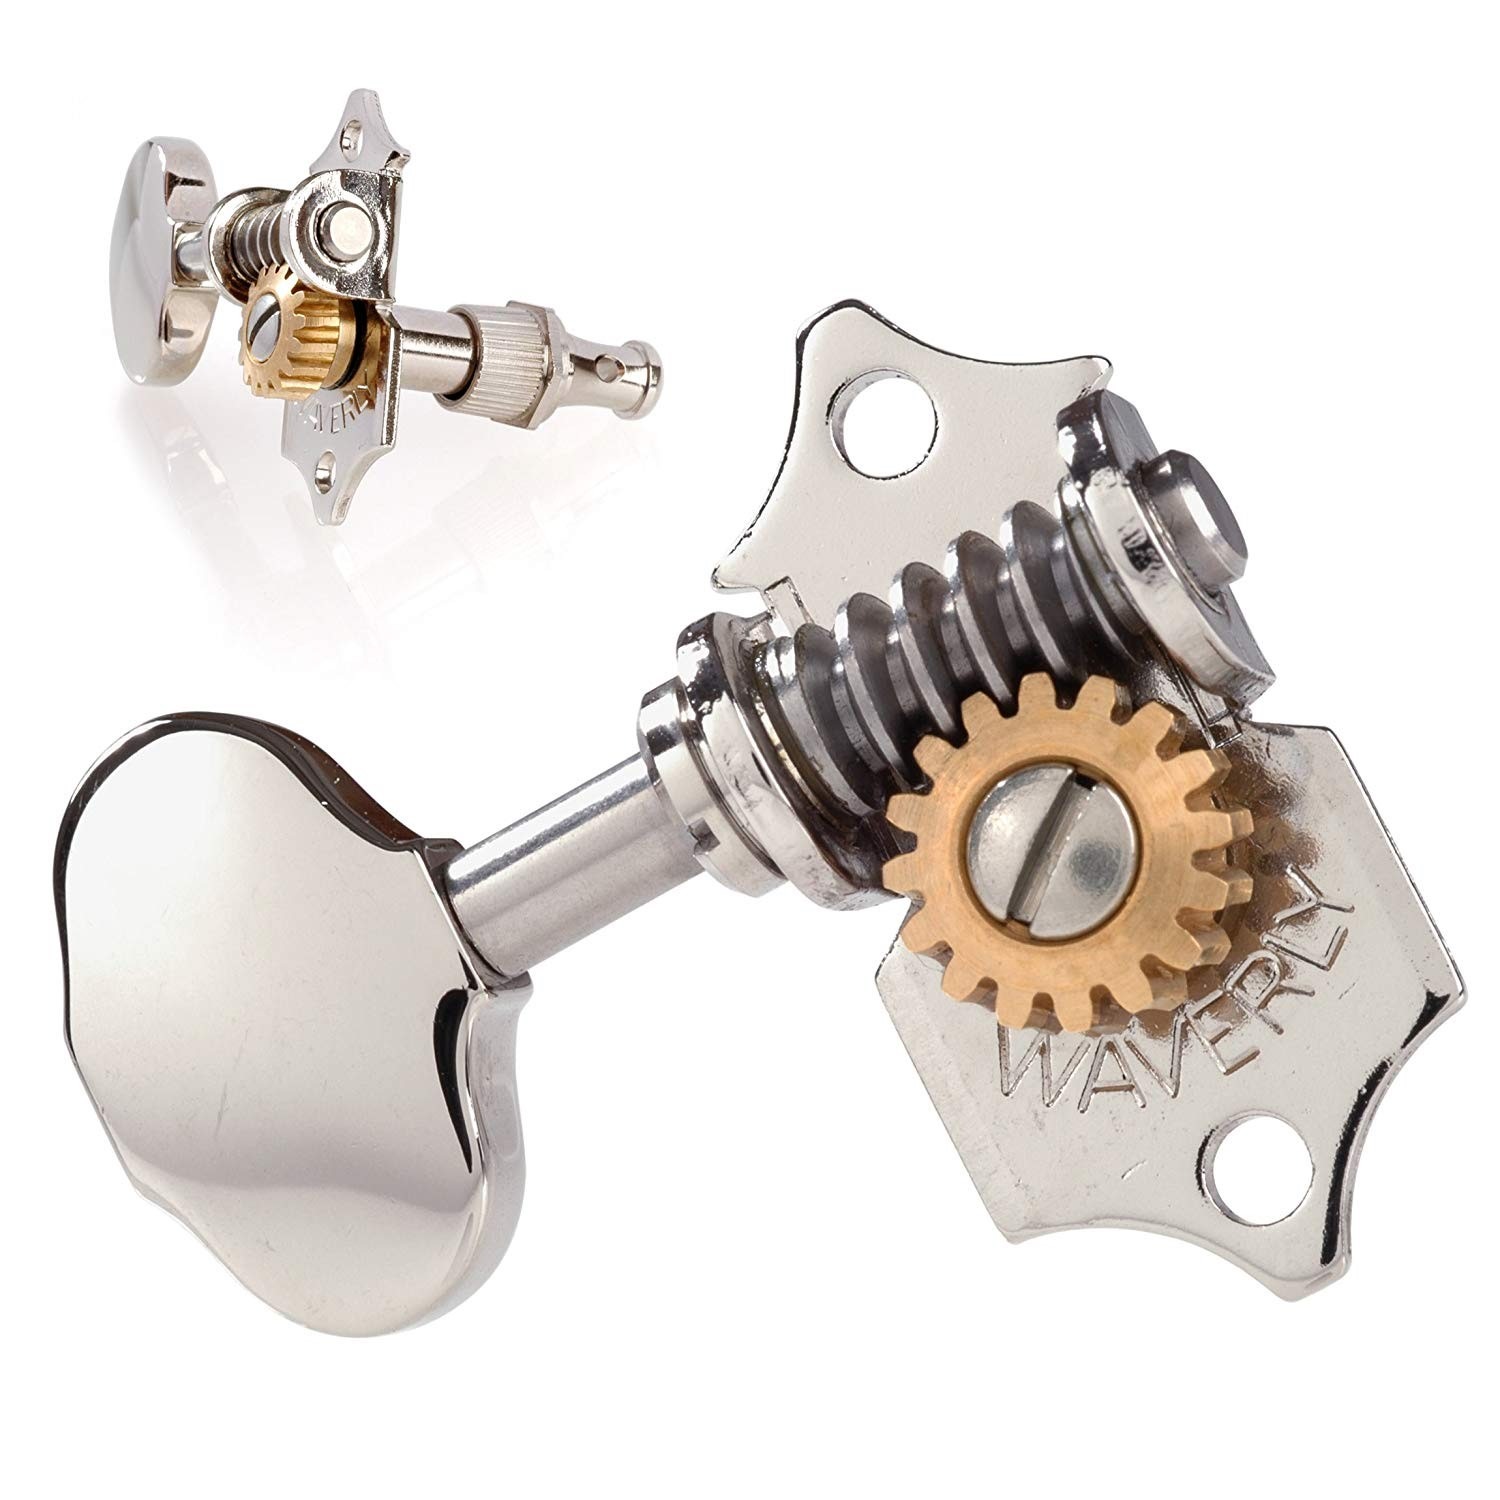
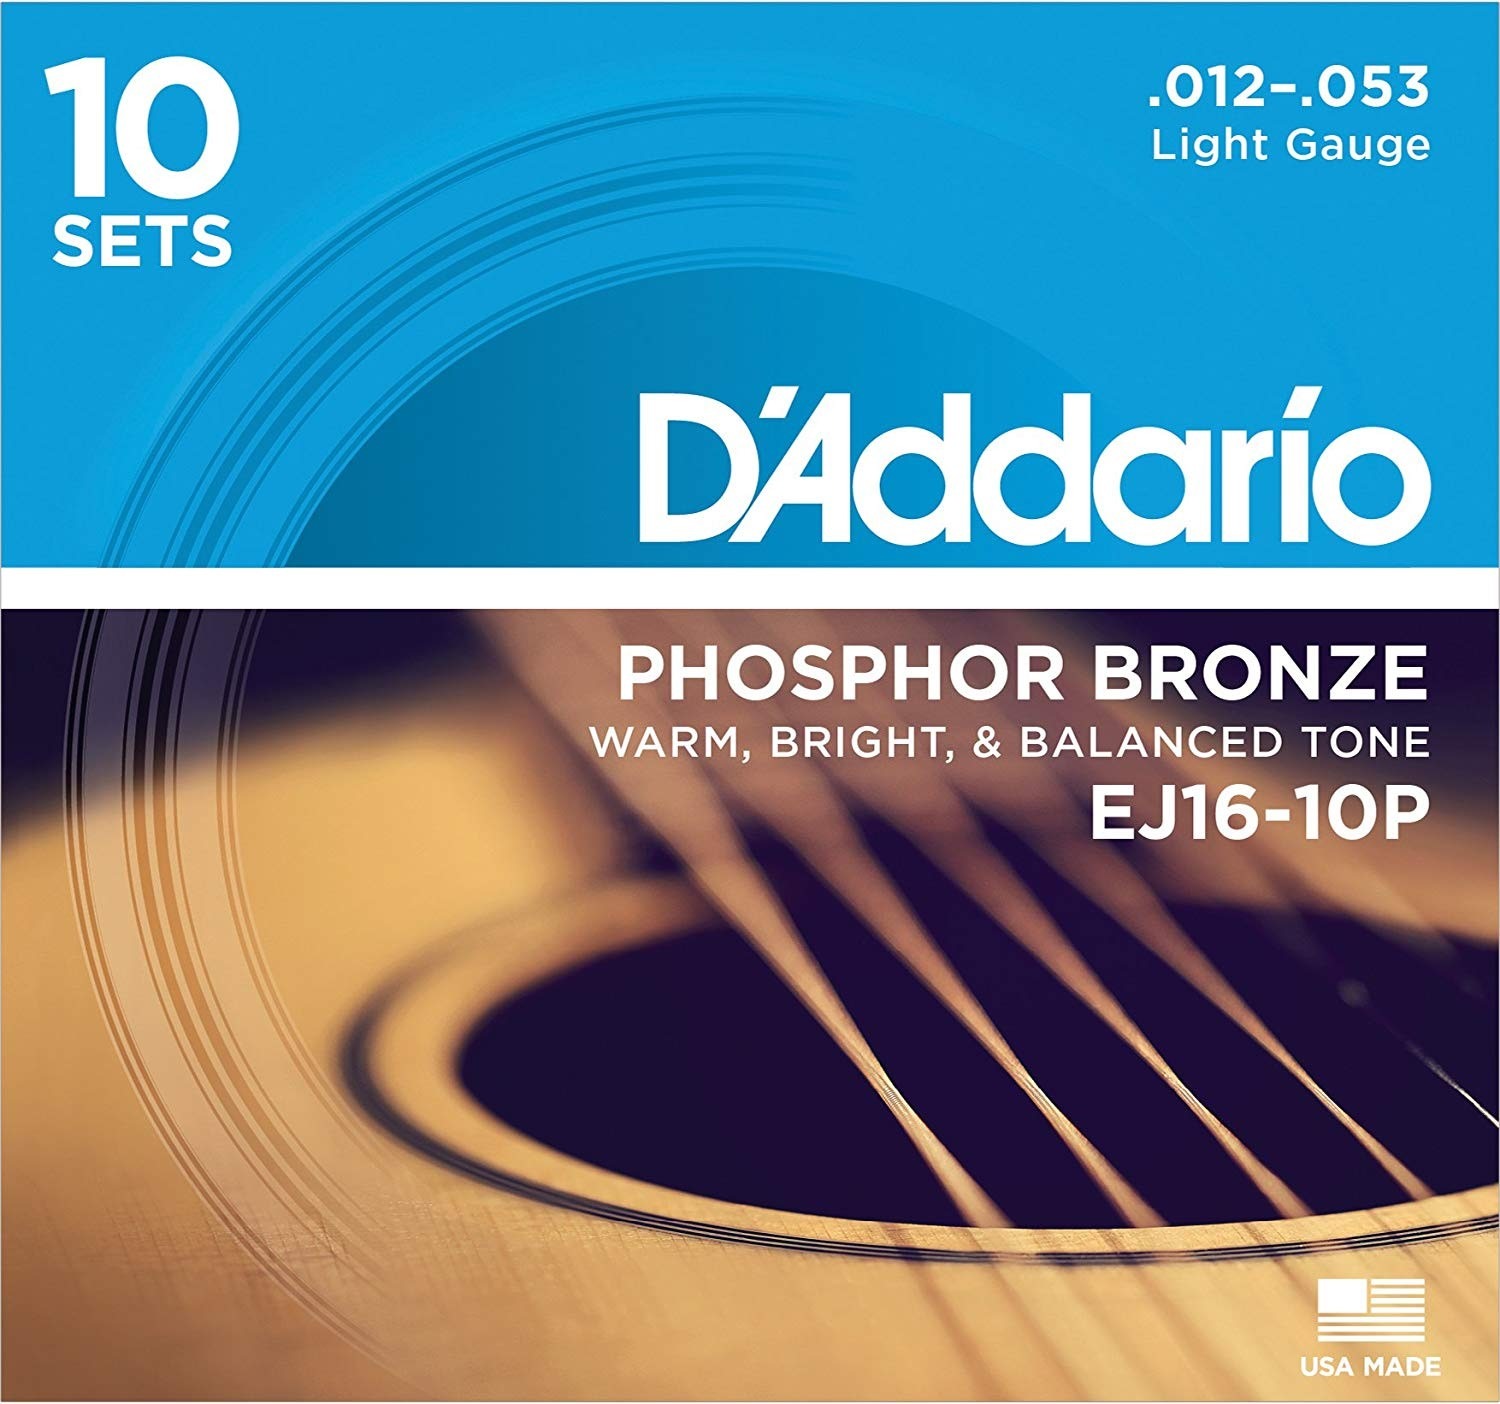
Tuners and Strings
Note that tuners and strings aren’t included in these guitar kits.
We recommend you get a set of Waverly Tuners and D’Addario Phosphor Bronze Strings for your acoustic.
Remaining Supplies
We’ve covered the three luthier-specific toolkits you’ll need for your acoustic build, and now we’ll go into the more generic stuff.
This includes good quality power tools, hand tools, glues, wrenches, etc.
Let’s step through the required list of tools one by one:
- Electric hand drill
- Center punch/awl
- Coping saw
- Glue brushes
- 1/2“ Chisel
- 6” Steel Rule
- Small rasp
- File set
- Fret leveler
- Fret Cutter
- Dressing stick
- 18” Straightedge
- Deadblow fret hammer
- .020” Gauged Saw
- 4mm Allen Wrench
- Scraper blade
- Nut-Slotting Files: 0.016” Width and 0.035” Width
- 1/4“ Diameter Brad-Point Drill Bit
- Medium fret dressing file
- Bridge pin reamer
- Radius Sanding Block, 16” Radius
- 50X Clothes Pins
- X-Acto Knife
- Titebond Glue
- Feeler gauges
- Small carpenter’s square
Here’s a list of required supplies:
- Titebond Glue
- 3/4 “ plywood workboard (24” x 20”)
- Super Glue (Thin and Medium)
- Weld on cement
- Low tack protective tape
- Double stick tape
- Rubber binding bands (or binding tape)
- Masking tape
- Wax paper
- White pencil
- Sandpaper (80, 100, 150, and 220 grit)
- Felt-tip marker
- Clean cotton glove
- Sandpaper (2+ sheets of each grit): 150, 220, 320, 600, 800, and 1200 grit
And finally, here is a list of finishing materials (for an aerosol nitrocellulose lacquer finish):
- Sandpaper (2+ sheets of each grit): 150, 220, 320, 600, 800, and 1200 grit
- Guitar finishing step by step (book)
- ColorTone grain filler
- 6X ColorTone Clear Gloss aerosol nitrocellulose lacquer
- ColorTone Concentrated Liquid Stain (Red Mahogany and Tobacco Brown)
- Polishing Compound (medium and fine)
- Swirl Remover (optional)
- Blush eraser
- Paint stripper
- Naphtha solvent
- Masking Supplies: Electric hand drill, brown paper, newspaper or rubber balloon for soundhole masking
And that’s all of the supplies you’ll need.
Once you have all of the supplies in place and your workspace in order, you’re ready to begin assembly! Some of the items listed above are fairly popular and may not be in stock -- if this is the case, there are alternative vendors on Amazon from which you can get the same supplies/tools.
The Acoustic Guitar Kit we recommended has a clear and thorough instruction manual for assembling your guitar (clocking in at 40 pages of detailed instruction, with pictures and illustrations).
Wrapping It Up
Now you know how to build an acoustic guitar from a kit! You can officially classify yourself as a “guitar maker” -- or put more elegantly, a learning luthier. As I mentioned in the beginning, it’s a rewarding endeavor that takes some planning, effort, and hard work.
But as you know… nothing ever came about without hard work. Guitar building is tough, but if you’re willing to put in the effort and build up a solid acoustic guitar from a quality kit, then this is the perfect project for you.
But if you’re still on the fence... you can check out the full StewMac Acoustic Kit Instruction Manual here to see exactly what the build entails.
Either way, the decision is ultimately in your hands.
Will you take on the challenge to build your own acoustic guitar? Remember, the feeling of satisfaction you’ll get when you strum your very first chord on a guitar that was 100% your own creation, I guarantee you’ll feel a sense of accomplishment like never before!
I wish you luck in your acoustic-building endeavors!